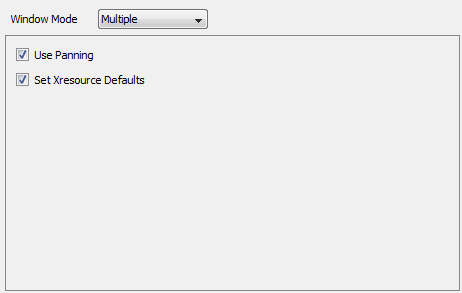
Quantcast
Channel: Welcome to the StarNet Knowledge Base
Viewing all 285 articles
Browse latest View live

X-Win32: X-Config – Windows Tab

$
0
0

Window Mode

– Multiple

Each individual application will run in its own separate window. There is no main root window. The application looks contains its own windows title bar and can be moved and resized accordingly.

Note: XDMCP sessions always run in single window mode. There is no multiple window option for a default XDMCP session.

Propery

Description

Use Panning

Panning allows windows that appear partially off screen in Multiple Window Mode to be gently nudged back on screen. When a window is off screen, move the cursor into the region of the X window and press against the edge of the screen.  The window will slowly move back on screen.

Set Xresource Defaults

Notifies the remote host that X-Win32 can accept the default color options of applications that use Xresources.  Uncheck if you have set up your own custom color resources in the .Xresource file.
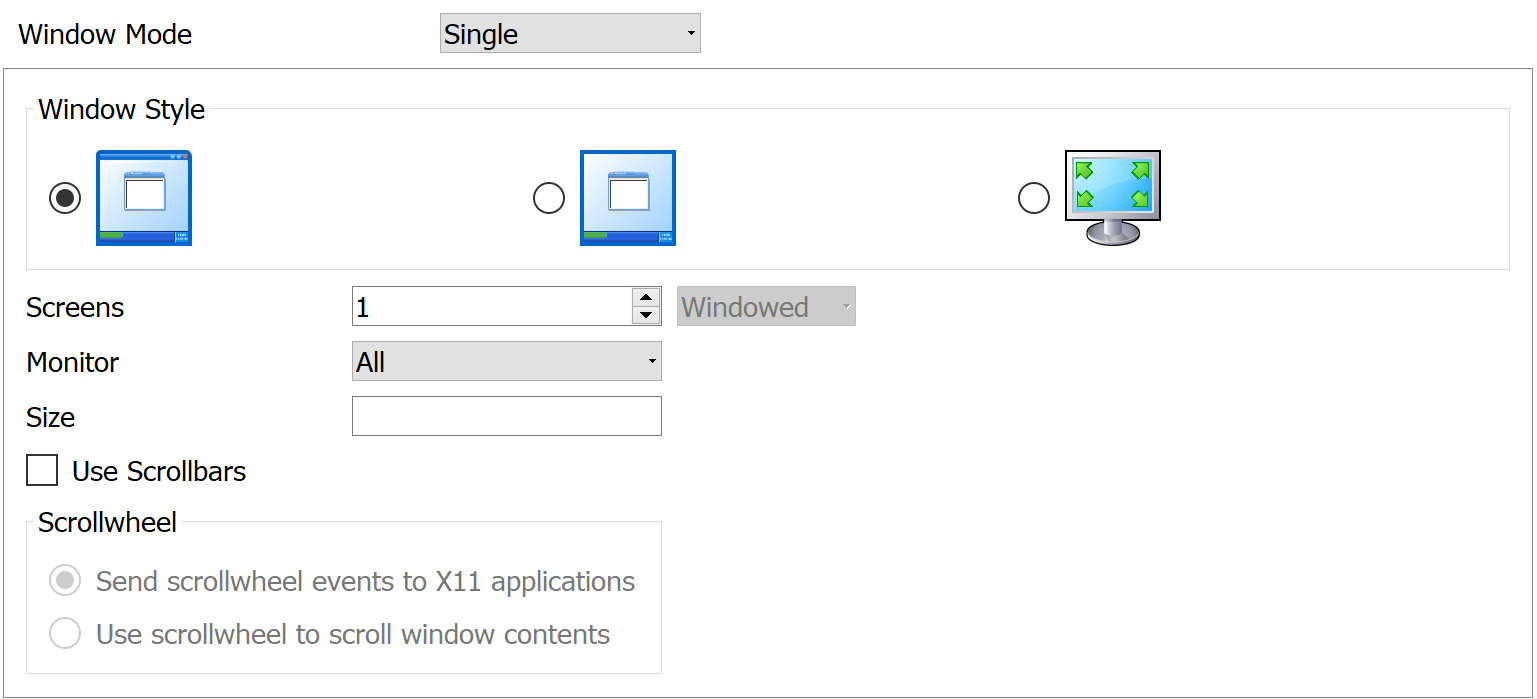
 

– Single

Single Window mode launches a root window defined by the height and width in the Geometry section of the single Window tab. All connections will launch in this main window. In order to move or resize the applications displayed in single window mode, a window manager (such as twm, gnome-wm or kwin) needs to be running. Typically, single window mode is only used to display a full remote desktop.

Property

Description

Window Style

Standard


Select this option to run X-Win32 in Single Window mode as a large single
window as specified by the Height and Width options in the Geometry section.

No Decoration


Select this option to run single window mode with no titlebar,
but still show the task bar.

Fullscreen

Select this option if you want the single window to take up the entire
screen size. This option is best suited for systems with multiple monitors


Screens

X-Win32 can be configured to accept DISPLAYS with multiple screens (192.168.5.2:0.0, 192.168.5.2:0.1, 192.168.5.2:0.2 etc).  Select the number of screens you would like to use to enable multiple screen support.  Multiple Screen support is only available in Standard Window Style  (See below for more options)   

Windowed


Each screen will appear in its own window and can be moved independently of the other screens

Tabbed


All screens are contained in one window and can be switched by clicking on the tab with the screen number you would like to view.


Monitor

On systems with multiple monitors this option allow single window to be sent to a monitor specified by the number, or to span all monitors.  The maximum number of monitors is dependent on the local workstation and its Windows operating system. Windows provides the numerical identification of each monitor, in Display Properties.

Size

Specify the screen size HEIGHTxWIDTH in pixels (eg 1024×768)

Use Scrollbars

By default, X-Win32 uses the RANDR extension to resize a single window. Certain applications do not behave correctly with the RANDR extension. The "Use Scrollbars" option adds scrollbars to the single window allowing the viewable area to be resized and shrunk as needed but still maintaining the X applications original size.

Other Options

Property

Description

PseudoColor

Legacy X applications used colormaps to define
the visuals

Emulation

Use 24 bit TrueColor as the default visual and emulate the 8 bit PseudoColor on top of it

Root Visual

Make PseudoColor the default visual.  Any application that does not specify its Visual will default to PseudoColor.  24 bit TrueColor is still supported if specified

Only

The X Server will run in 8 bit only mode.  There is no 24 bit TrueColor.


Backing Store

Some X-applications may request backing store on windows that are complicated to draw, which can slow down the response of the display. When a window is obscured, hidden behind another window, it must be redrawn when it is returned to the front. When cached, CPU usage is significantly decreased, and display time is accelerated.

Off

Disables the feature. Information of the windows will not be saved.

When Requested

Only uses backing store if the X application requests it. This is the default setting.

Always On

Causes the X server to use backing store on all windows, even if the X application does not request it. This is recommended for slower network connections, such as dial-up.


Use Direct 2D


Direct2D enables X-Win32 to utilize advanced graphics card (GPU) capabilities when drawing images.  Massive Performance increases (2X – 10X faster) have been seen when drawing images, moving windows and rendering text

There is an overhead on certain line drawing operations which will cause a slowdown.  Turn this feature off if you are experiencing a slowdown with your application.

This option is only available on Vista SP2 with the Platform Update and Windows 7 machines.  Other users will default to a nonaccelerated rendering engine.  


Use Software Renderer For OpenGL

OpenGL commands will be processed by the system’s Video Card. Check
this option to use the OpenGL rendering as provided by the Windows software.

Display Splash Screen On Startup

Checking this option displays the splash screen when X-Win32 is launched

Disable Xinerama Extension

On certain Solaris machines and Gtk+ based applications, the Xinerama extension causes issues with mozilla and CDE.  Check this box to disable the Xinerama extension if you are having issues with your windows or menus appearing  in odd places..

Disable Composite Extension

This option turns off the Composite extension used for layering windows.  Check this option if you are having issues with legacy applications redrawing properly.

Force Composite redirection for rootless windows

This forces the window to use composite redirection that would skip a couple layers for rendering into the composite off screen pixmap. It is then copied to the rootless off screen pixmap before the server blocks for more network input.

This comes with a higher memory usage since the server has to maintain a second off screen buffer for all top level windows and some extra cpu cycles to copy the screen contents to the rootless buffer.


X-Win32: X-Config – Connections

$
0
0


When X-Win32 is launched, the X-Config window will appear. The “Connections” tab is the first options in X-Config. To run X-Win32 18 in passive mode, launch a session. When the session window option appears, this means X-Win32 is running. Users can send X information to their Windows machine and X-Win32 will interpret and display. Previous versions, X-Win32 will run in passive mode in the system tray at launch.

Connections

The Connection Tab is the most important Tab in X-Config.  This tab allows a user to create edit and launch connections to remote hosts.

Creating a New Connection

Method

Description

Manual

Click on the Manual button to Manually create a new Connection.  All information is left blank for the user to fill in himself.  Descriptions of the connection Properties can be found in each Connection Type’s respective chapter.  

Wizard

Click on the Wizard
Button to have a step by step guide in creating a session.  The options in the Wizard Connection are limited to make a basic connection.  For full options, choose the Manual Configuration method

Cloning Connections

In the Connections Tab, right click on an already created connection to bring up the menu.  The menu option Clone will give submenus for Manual and Wizard.  Selecting a submenu item will bring up the Manual or Wizard connection method with the connection options prefilled which the user can change as needed.


Launching Connections

After a Connection has been created, it must be launched in order to connect to the remote host.  There are several methods available for launching connections via X-Config

  • Highlight the Connection and press the Launch button

  • Right Click on the Connection and press the Launch  menu item

After you have launched the connection, X-Win32 will attempt to connect to your remote host.  If an error occurs, the error will be displayed in the Status Dialog box.

* Launching a Connection When X-Win32 Starts (Autostart) *

Connections placed in the Autostart folder under My Connections will automatically be launched when X-Win32 starts up.  This makes it very convenient to quickly connect to your remote system.

* Creating Shortcuts to Launch Connections *

.xw32 files have file associations with X-Win32.  Double clicking on a .xw32 file will cause X-Win32 to automatically launch the Connection.  A user can create a shortcut to the file in X-Config by highlighting the Connection and clicking the Shortcut button in the Connections tab.  Double clicking on the created shortcut will launch the connection.

Editing Connection Settings

Once a new Connection has been made, a user can edit the Connection Properties by highlighting the Connection and pressing the Edit  button, by right-clicking on the Connection and selecting Edit or by double clicking on the Connection.  A dialog box will appear with all the Connection settings which can be changed as needed.  Note that these settings can only be changed if the user has write permission on the directory where the Connections are stored.

Removing Connections

Connections are stored in .xw32 files on the user’s system.  Connections can be removed by highlighting the connection and pressing the Remove button, or by right-clicking on the connection and selecting the Remove item.  A user can also delete the .xw32 file from the system to remove the Connection.

Adding Folders

.xw32 files store the Connection options and can be stored in any directory on your system.  Click on the Add Folder button to add a new path. The Name field is the name that will be displayed in X-Config and in the system tray.  The location is the path to the specified directory.  Use this option to centrally locate Connections for multiple users on a system or in a domain.

Password Manager

The Password Manager allows a user to quickly change the passwords of multiple Connections.  This is an important feature if you connect to multiple servers and your password changes often (for example expiring passwords).  Click on the Passwords  button in the Connection Tab to Launch the Password Manager.

Selecting Connections

When the Password Manager Launches, a dialog showing all the current Connections with Password Properties appears.  A user can manually check Connections the  that he wants updated, or he can search for selected Connections using the Select button.  Options to Select multiple Connections are listed below

Option

Description

Login

Select all Connections with the specified Login name.  This
selection can be combined with Old Password
or Not Stored to further
filter the Connections

Old Password

Select all Connections with the Stored Password that matches
the text in this field.

Not Stored

Select all Connections where there is no Password saved

Updating Passwords

After you have selected your Connections, press the Update button to update your Connections with a new Password.  A dialog box will appear asking for the new Password.  Enter in and confirm the new Password and click the OK button to update your Passwords

Clearing Passwords

After you have selected your Connections, press the Clear  button to erase the Passwords from the system.  The Connection will now launch with no Password stored.  The user will be prompted to enter in the password after the connection has been launched.

Exit when all connections have closed

Automatically shut down X-Win32 when there are no more active connections.


X-Win32: Passive Mode

$
0
0

Passive mode is when X-Win32 is running without a connection being established. X-Win32 will be passive until X communication is being received by the Windows machine. Once received, X-Win32 will translate and display.

Usage for Passive Mode:

  • Using a third party application such as Putty or SecureCRT to connect to their Unix/Linux host and require X traffic to be translated.
  • Users who are being sent X communication from another computer.
  • User has an X application on their Windows machine that needs to be translated.

X-Win32 18

When executing X-Win32, X-Win32 will run in the foreground with a session option window prompted. Different ways to start Passive Mode in X-Win32 18.

  • Start X-Win32. X-Config window will appear. If you do not have any session created, click the “Launch” button located on the right of X-Config.
  • Run the xwin32.exe located in the installation folder. By default X-Win32 18 is installed at:
    C:\Program Files (x86)\StarNet\X-Win32 18\xwin32.exe
  • Run Passive Mode Without X-Config
  1. Create a X-Win32 session.
  • Please create the session with your host, username, password, and command or you will receive an error window. You can use the command exit
  • Launch the session. The session option window will be prompted which indicates that X-Win32 is running.
  • Create a shortcut for the created session by right clicking on the session in X-Config and selecting “Shortcut”.
  • Launching from the shortcut will run X-Win32 without X-Config.
    • The shortcut can be placed in the Startup folder in Windows in ordered to be launched when you first start Windows.

    X-Win32 2014 and Below

    Simply launching X-Win32 will run X-Win32 in Passive Mode in the background under the system tray.

    Security Notes:

    Using a third party ssh application and setting your own display will cause the X traffic to be transferred over port 6000 instead of using the default ssh port 22. To use ssh port throughout the session, please enable X11 forwarding on your host and ssh application. Also, do not set your display.

    X-Win32: X-Config – Network

    $
    0
    0


    Network

    The network can be configured to specify exactly how the DISPLAY environment can be configured.  A user can specify the IP address to use and which Display number to start at.  Sound support authentication can also be enabled for certain connections.

    Property

    Description

    Display Address

    Assigns the address that X clients will use

    Automatic

    Sets the Display address to the IP address used by the local windows machine
     

    IPSmart

    IPSmart  is used to acquire and deliver the address of the X-server (your local workstation), instead of the firewall between your X-server and the remote host. This creates a direct, functional connection between your workstation and the remote host. The remote host receives the IP address of your workstation, instead of the firewall enabling you to seamlessly pass your computer’s display to the remote connection.  
     

    Override

    Send the display to the IP address specified in the Override field.  An X server must be running on the system specified.


    Base Display Number

    Each X Server (X-Win32 or otherwise) listens on a Display Number.  With multiple X Severs on a host, this number is used to reference the proper X Server.   


    Activate Sound Output

    Enable Sound Support in XDMCP sessions

    Allow all hosts to play Sound

    All sounds sent to X-Win32 are automatically accepted and
    played


    Prompt for hosts

    Prompt the user to allow sounds from a specific remote host

    Use ESound Authentication only

    Use hosts in esd_auth file only


    X-Win32: X-Config – Input

    $
    0
    0

    Input

    The mouse, keyboard and numerical keypad, can be configured to fully adapt to the applications that run on remote servers. This may be needed when the three button mouse is needed for the remote application, the application is setup for a keyboard interface to a different language, the numerical keypad needs to be setup for the application.

    Mouse

    Property

    Description

    3 Button Simulation

    Older Mice only had 2 buttons.  The middle mouse button could be simulated by clicking both the left and right mouse button at the same time.  3 button simulation gives the user the choice to set this feature if needed.   

    Auto

    Auto is the default setting for mouse input. X-Win32 detects the number of buttons on the mice and sets the functionality to on or off accordingly.  

    On

    When On is enabled, the middle button of a 3-button mouse is simulated by simultaneously  clicking the left and right mouse buttons. This 3-button feature is often needed for remote applications.

    Off

    When Off is selected, no configurations are applied; the mouse is used as is. This should only be used when you are using a 3-button mouse at your local workstation – most remote applications are setup to interact with a 3-button mouse.


    Mouse Wheel

    This option allows the mouse wheel functionality to be emulated using arrow keys

    Buttons

    Buttons is the default option.  Mouse wheel up and down are set.

    Keys

    Keys maps the MouseWheelUp to the Up arrow.  MouseWheelDown
    is mapped to the down arrow.

    Off

    MouseWheelUp and MouseWheelDown are turned off.  The remote application will only detect 3 available mouse buttons.


    Keyboard

    Property

    Description

    Enable XKeyboard Extension

    The X Keyboard Extension allows X-Win32 to use X Keyboard Maps which extend the ability of typical key maps.  These key maps allow specific keyboard configurations for which match most keyboards in use today.  Turning off the X Keyboard extension will allow old style key maps to be specified manually.

    Options for the X Keyboard extension include:

    Model

    Select the default keyboard model.  If set to Automatic, X-Win32 will choose the keyboard model based on the Windows system settings.

    Layout

    Select the keyboard language.  If set to Automatic, X-Win32 will choose the keyboard language based on the Windows system settings

    Variant

    Select the keyboard variant.  If set to Automatic, X-Win32 will choose the keyboard variant based on the Windows system settings


    Emulate Numlock

    Send the actual number when using the keypad rather than the keypad button.  For example when Emulate NumLock is enabled, and you press the "7"button on the keypad, the key send will be the same keycode as "7" on the top of the keyboard.  With emulate NumLock disabled, the keycode sent will be KP_7.  On certain Operating Systems (most notably AIX), the NumLock button is treated as a keyboard modifier (like SHIFT or ALT) and modifies all keys on the keyboard.  Enabling this feature works around this issue.  The default setting is disabled.    

    Do not allow clients to remap the keyboard

    Allow the remote host to re-map the local Windows keyboard. Uncheck this option if using Xmodmap

    Send Left Alt to X

    Checking this option will allow the Left Alt button to be sent to the remote host rather than being intercepted by the Windows Operating system.

    Send Right Alt to X

    Checking this option will allow the Right Alt button to be sent to the remote host rather than being intercepted by the Windows Operating system.

    Japanese IME Support

    IME support is available by default in single window mode.  Follow these steps in multiple window mode to enable IME support:

    1. Open an xterm
    2. LC_CTYPE=ja_JP XMODIFIERS=@im=XIME <command>

    This will set the input method to support IME.  You can also export these environment variables (LC_CTYPE and XDMODIFIERS) in your login profile.


    X-Win32: X-Config – Font

    $
    0
    0

    Font

    Fonts must be rendered in order for remote applications to function properly.  Remote applications access fonts available from X-Win32 on the Windows side., not the remote host where the application resides.  X-Win32 ships with the most typical fonts needed by almost all applications. Usually no new fonts need to be installed.  However, in certain circumstances, a specific application may use a custom fontset which X-Win32 does not supply.  In this instanceX-Win32 provides the ability to add extra fonts to remote applications through a font path.

    Adding a Font Directory

    Adding a Font Folder

    If the fonts needed are located on the local Windows machine, press the Folder button to add the folder where these fonts reside.  The font folder must have a fonts.dir file and the fonts should be in .pcf.gz or .bdf formats.

    Adding a Font Server

    For fonts located on remote systems, X-Win32 can connect to a font server.  This font server must be up and running for X-Win32 to connect to it.  Press the Server button and put in the host name or IP address of where the font server resides.  Optionally change the port number if your server is not using the standard port.

    Editing the Font Path

    Highlight a font path and press the Edit button to change the location of the path.  If it is a font server, you can change the hostname or IP Address.  

    If you have added custom font directories to the font path you may want X-Win32 to choose them first.  Highlight a specific directory and use the UP and DOWN arrows to move the directory in the list.  Directories at the top of the list are chosen first.  NOTE:  Font servers should always be placed at the bottom of the list as a remote connection is needed to access the fonts. Fonts from font servers will generally take longer to render than fonts located on the Windows machine, thus slowing down productivity.

    Removing a Font Directory

    Highlight the font directory and press the Remove button to remove the directory from the list.

    Replace NUL Characters With Spaces

    NUL characters by default have no corresponding glyph (rendered font), and thus can appear as any character, usually an empty box.  Check this box to force a NUL character to be rendered as a blank space.    


    X-Win32: X-Config – Security

    $
    0
    0


    Security

    The Security tab contains options which specify which connections are allowed to be displayed on the X Server

    Property

    Description

    Allow by Xauth Cookie

    Xauth Cookie authorization is based on MIT-MAGIC-COOKIE-1 (also known as magic cookie method),  in which the UNIX program Xauth views and transfers cookies.

    The X-server obtains the cookie, which is a 16-byte random number. When the X-application connects, it sends the cookie. If the 16 bytes sent by the application are the same as the bytes in the X-server, the client is authorized.

    Xauth File

    The Xauth cookie is a file named Xauthority  that is  stored in your home directory.

    This file is a password for the X-Win  display – do not assign that file  group or world read or write permissions. The correct permissions for this file are read and write, only for the local user (you).


    Allow By Address

    Allows remote clients to connect based on the host name or IP address.

    Allow all host addresses

    All remote clients requests will automatically be accepted


    Only allow these host addresses

    Add hosts to the allowed host list.  Only hosts on the list will be authorized to connect.


    Prompt for connections not allowed by other
    means

    When a client is not authorized via Xauth, Address, or SSH with X11 forwarding, a request will occur with each connection attempt – allow or deny that connection.


    X-Win32: X-Config


    Debugging FastX

    $
    0
    0

    FastX comes equipped with many options to allow for better debugging of sessions. Debug messages generate a lot of data and can cause significant slowdown.  Only turn on debugging if absolutely needed

    Client Side Debugging

    Edit the url by appending parameters in separated by a semicolonto enable debugging

    For example

    https://server.example.com/client/connect;id=2fba2934538346aa58df6374585b6e06;debug=send

    Client Debug Options

    debug=send

    log all protocol messages from the client to the server

    debug=receive

    log all protocol messages from the server to the client

    debug=1

    log all protocol messages (from both client and server)

    wasm=0

    disable WebAssembly.  This will cause all image decompression to be done in pure javascript (which is slow)

    Server Side Debugging

    Set the DEBUG variable before starting the web server to enable server side debugging.  This will log messages.  Debug messages can be chained with a comma to enable multiple debugging sections.  You can also add a * to enable a class of debug messages

    For example

    Log all api calls
    DEBUG=fastx:api:* npm start
    Log all info from the web server to the session and all info from the web server to the link daemon
    DEBUG=fastx:monitor:*,fastx:link:* npm start
    Log Everything
    DEBUG=* npm start

    Server Debug Options

    fastx:connection:connect

    log session connection

    fastx:connection:messages

    log all communication from FastX client and server

    fastx:connection:events

    log connection creation and teardown

    fastx:api:request

    log requests from the client

    fastx:api:process

    log packaged message that will be processed

    fastx:api:queue

    log queuing of the messages

    fastx:custer:list

    log the list of cluster members

    fastx:cluster:util

    log all cluster setup and refreshing of cluster

    fastx:system:config

    log configuration updating

    fastx:system:cache

    log low level caching actions

    fastx:system:file

    log file interactions for system configuration

    fastx:session:dirty

    log when sessions need to be updated

    fastx:session:update

    log when session updated

    fastx:monitor:com

    log communication from web server to session

    fastx:monitor:session

    log communication from session to web server

    fastx:link:netstring

    low low level communication between web server and user’s running link daemon

    fastx:link:messages

    log communication between web server and user’s link daemon (summary)

    fastx:user:admin

    log user’s tests for admin


    FastX Events

    $
    0
    0

    FastX 3 uses an event based system to communicate from the client web page, to the protocol page which is located in an iframe  FastX integrators wishing to fine-tune their user experience can add event listeners to these window message events to emit actions when the message occurs.

    Server to Client Messages

    These messages originate from the server and are propagated to the client.  To listen for events, add a window.addEventListener to your script. For example

    <script>
       window.addEventListener("message", function myEvent (evt) {
           if(evt.data.msg == "connected") {
             console.log ("Connected!", evt.data.body);
           }
           // ... other custom code here 
       });
    </script>

    ‘error’

    The session disconnected with an error

    {
       "msg": "error",
       "body": "Error Message"
    }

    ‘disconnect’

    The session disconnected normally

    {
       "msg": "disconnect",
       "body": "Disconnect Message"
    }

    ‘security.password’

    The session requires a password to continue establishing a connection.  The client should send a “security.password” response message

    {
       "msg": "security.password",
       "body": {}
    }

    ‘security.none’

    The session does not require any security protocol to continue.  The client should send a “security.none” response message

    {
    "msg": "security.none",
    "body": {}
    }
    

    ‘settings.update’

    The server sent a settings update message. The settings update can have one or more of the following settings.

    {
       "msg": "settings.update",
       "body": {
          "1": {  // keyboard
            layout: 0x00000004,
            type: 0x00000001 
          }, 
          "2": {  // geometry
             width: 1024,
             height:768,
           }, 
          "3": { // network autodetect
             enabled: true
           },  
          "4": { // compression
            min: 0,
            max: 7,
            current: 0,
          },  
          "5": { // frame rate
             min: 1,
            max: 60,
            current: 60
           },  
          "6": {  // frame window
              min: 1,
              max: 60,
              current: 2
           }, 
       }
    }

    Client to Server Messages

    These messages are used to communicate with the server.  To send a message.  Add a postMessage to the iframe

    <script>
       iframe.contentWindow.postMessage ({
         msg: "settings.networkAutodetect",
         body: {
            "enabled": false
         }
       });
    </script>

     ‘connect’

    The initiate the session connection. Note this should be only sent once.

    {
       "msg": "connect",
       "body": {
          id: "session id",
          options: {
             identity: "string that the server will see as the connection name",
             debug: "send" | "receive" | 1 
          }
          
        }
    }

    ‘security.password’

    Respond to a ‘security.password’ request from the server.  Note this should be only sent once.

    {
       "msg": "security.password",
       "body": {
           username: "username",
           password: "password-string-from-a-connect-command"
        }
    }

    ‘security.none’

    Respond to a ‘security.none’ request from the server.  Note this should be only sent once.

    {
    "msg": "security.none",
    "body": {
         username: "username"
     }
    }
    

    ‘settings.geometry’

    Change the width and height of the session

    {
       "msg": "settings.geometry",
       "body":   {
          width: 1024,
          height:768
        }
    }


    ‘settings.keyboard’

    Change the keyboard layout and type of the session

    {
       "msg": "settings.keyboard",
       "body": {
           layout: 0x00000004,
            type: 0x00000001 
        }
    }
    

    ‘settings.networkAutodetect’

    Enable/disable automatic adjustments of network settings

    {
       "msg": "settings.networkAutodetect",
       "body": {
            enabled: true
        }
    }

    ‘settings.compression’

    Change the compression level of the image data

    {
       "msg": "settings.compression",
       "body": {
           min: 0,
           max: 7,
           current: 1
        }
    }
    

    ‘settings.frameRate’

    Change the maximum frames per second to be sent from the server

    {
       "msg": "settings.frameRate",
       "body": {
           min: 1,
           max: 60,
           current: 30
        }
    }

    ‘settings.frameWindow’

    Change the maximum frames sent by the server that have not yet been acknowledged by the client

    {
       "msg": "settings.frameWindow",
       "body": {
           min: 1,
           max: 60,
           current: 30
        }
    }

    ‘mouse.down’

    Send a mouse down event to the server

    Possbile mouse flags are:
    LEFT = 0x01,
    MIDDLE = 0x04,
    RIGHT = 0x02,
    BACK = 0x08,
    FORWARD = 0x10

    {
       "msg": "mouse.down",
       "body": {
          flags: LEFT | MIDDLE | RIGHT | BACK | FORWARD,  //Mouse buttons that were down at the time of the event
          pos: [0, 0] //position of the mouse when the down event occurred
        }
    }

    ‘mouse.up’

    Send a mouse up  event to the server

    {
       "msg": "mouse.up",
       "body": {
          flags:  LEFT | MIDDLE | RIGHT | BACK | FORWARD,  //Mouse buttons that were down at the time of the. see mouse.down
          pos: [0, 0] //position of the mouse when the down event occurred
        }
    }

    ‘mouse.move’

    Send a mouse move event to the server

    {
       "msg": "mouse.move",
       "body":  {
          pos: [0, 0] //position of the mouse when the down event occurred
        }
    }

    ‘mouse.wheel’

    Send a mouse wheel event to the server

    {
       "msg": "mouse.wheel",
       "body": {
          delta: 120, //mouse wheel delta.  Negative numbers reverse the wheel
          pos: [0, 0] //position of the mouse when the down event occurred
        }
    }


    FastX, Gnome 3: Oh no! Something has gone wrong.

    $
    0
    0

    Problem

    When trying to display a gnome 3 desktop. Gnome displays the following error:

    Oh no! Something has gone wrong.
    A problem has occurred and the system can’t recover. All extensions have been disabled as a precaution.

    This error is typically prompted when trying to bring up a gnome 3 desktop and the host has a NVIDA video card. The problem is FastX’s X display is not compatible with the proprietary NVIDA drivers.

    Solution

    VirtualGL installation is required in order to render gnome 3 correctly.

    VirtualGL is an open source toolkit that gives any Unix or Linux remote display software the ability to run OpenGL applications with full 3D hardware acceleration.

    For instructions on setting up VirtualGL with FastX, please go to https://www.starnet.com/xwin32kb/virtualgl/.

    FastX: Gnome Screen Saver Lock

    $
    0
    0

    Problem

    • FastX displays a black screen, login window, or screen saver as a screen shot in the session manager.
    • When a user resumes their gnome session, they have to enter their password again to display the desktop.

    This occurs when the screen saver is enabled in gnome.

    Solution

    Disable the screen save in Gnome.

    Gnome 3 (RHEL 7)

    The following are instructions from Gnome on changing the settings for their screen saver. Please note the first few steps asks to create certain files. These files may already exist on your Red Hat 7 host.

    https://help.gnome.org/admin/system-admin-guide/stable/desktop-lockscreen.html.en

    Here are the settings to use for the file
    /etc/dconf/db/local.d/00-screensaver

    
    # Specify the dconf path
    [org/gnome/desktop/session]
    # Number of seconds of inactivity before the screen goes blank
    idle-delay=uint32 0
    
    # Specify the dconf path
    [org/gnome/desktop/screensaver]
    
    # Lock the screen after the screen is blank
    lock-enabled=false
    
    # Number of seconds after the screen is blank before locking the screen
    lock-delay=uint32 0
    

    Gnome 2 (RHEL 6)

    Run the following command to disable the screen saver.

    gconftool-2   --direct   --config-source xml:readwrite:/etc/gconf/gconf.xml.mandatory  --set /apps/gnome-screensaver/idle_activation_enabled false --type bool
    
    gconftool-2  --direct   --config-source xml:readwrite:/etc/gconf/gconf.xml.mandatory   --set /apps/gnome-screensaver/lock_enabled false --type bool
    
    gconftool-2  --direct   --config-source xml:readwrite:/etc/gconf/gconf.xml.mandatory   --set /apps/gnome-screensaver/idle_delay 0 --type int
    
    gconftool-2  --direct   --config-source xml:readwrite:/etc/gconf/gconf.xml.mandatory   --set  /apps/gnome-screensaver/logout_delay 0 --type int
    
    gconftool-2  --direct   --config-source xml:readwrite:/etc/gconf/gconf.xml.mandatory  --set /apps/gnome-screensaver/cycle_delay 0 --type int 
    

    FastX Clustering

    $
    0
    0

    Note: For FastX Version 2 clustering, click here

    Multiple FastX servers can be connected together to create a cluster. Clustering allows users to connect to any system and view/interact with/launch sessions in the cluster.

    Clustering offers better security and load distribution over a single machine.  Gateway servers can be used as the client access point while session servers can be hidden behind a firewall to do the heavy computing.  Combined with load balancing, the power of FastX can be seen.  New sessions can be routed to servers giving the implementers complete control of where sessions are started.  Power users can integrate their own job scheduling software into the FastX cluster launching sessions when the server resources become available.

    Setting up a cluster

    Installing the cluster package

    1. Download the FastX plugins package
    2. Extract the files tar xzf fastx-plugins.tgz
    3. copy the extracted plugins directory to var mv plugins /usr/lib/fastx/var
    4. Restart the web server service fastx3 restart

    Configuring a cluster member

    To join a cluster, a cluster member needs two pieces of information

    1. One (or more) url(s) of the FastX distributed database
      • Each cluster member comes with its own distributed database.  It is sufficient to have the url of a different FastX web server in your cluster
    2. The public keys of the other cluster members
      • Public keys are automatically stored by default in /usr/lib/fastx/var/authorized_keys

    Background

    FastX uses a distributed database architecture to communicate messages from one cluster member to another.  Communication is done using HTTPS with JSON Web Tokens for authenticating servers.  Messages are encrypted using destination server’s public key preventing unauthorized snooping on the system.

    Adding the first cluster member

    1. Log in as an administrator
    2. Go to the System section
    3. Click on Clustering > Servers
    4. Click New Server
    5. Add the url of the FastX distributed database (usually, a different cluster member)
      • Optionally add any https agent options.  Agent options can enforce added security measures when making a connection to the FastX distributed database
    6. Save
    7. Repeat Steps 4 – 6 to add multiple FastX distributed database urls for fault tolerance
    8. Restart the web server service fastx3 restart

    Adding additional cluster members

    You can repeat the steps above on each server that you want in the cluster.  However, as a convenience, FastX stores the cluster configuration in /usr/lib/fastx/var/config/cluster.json.   You can copy this file over from one server to another to quickly get up and running.

    1. Copy the /usr/lib/fastx/var/config/cluster.json from the initial cluster member to the new cluster member
    2. Restart the web server service fastx3 restart

    Cluster Configurations

    FastX Load Balancing and Job Scheduling

    $
    0
    0

    The power of a cluster comes from its ability to determine which system to start sessions on so that the load of the cluster is evenly distributed across all systems.  Furthermore, in a heterogeneous environment, some servers may have applications that others do not.  Or administrators may want to only allow a subset of users to launch sessions on a specific server while at the same time maintaining the same access point for all users to log in at.  There are two ways to accomplish this: load balancing and job scheduling

    Load balancing

    The goal of load balancing is to determine the proper server to start a session on.  Load balancing makes use of custom javascript functions that are executed in the web server using server data supplied from the cluster.  The javascript function returns the serverId of the system that will launch the session.  The session is them launched immediately.

    Load balancing can also be used to determine on which system a user should log in when logging in via ssh.

    Configuring load balancing

    1. Create a cluster
    2. Go to the System > Clustering > Load Balancing
    3. Select a script
    4. Click the Actions > Set Default Start Script
      • If you want to load balance the user at login, click Actions > Set Default Login Script

    The system will now load balance when starting a session based on the script you selected.

    Creating custom load balancing functions

    FastX ships with some basic predefined load balancing functions that are useful in simple situations.  However, load balancing can be extended by creating your own custom functions.  Basic scripting knowledge is required and javascript knowledge is preferred.  Contact support for help creating the load balancing function

    1. Create a cluster
    2. Go to the System > Clustering > Load Balancing
    3. Click New Script
    4. Enter a name
    5. Add your javascript function. See this load balancing tutorial for examples
    6. Save

    Static data and metrics

    Each FastX server periodically updates the cluster with its current status.  The status gives basic information such as number of Sessions running and Available RAM, but this data may not be enough to properly choose the right server to launch a new session on.  Static data and metrics expand the server information by allowing administrators to create custom parameters to attach to the server update (for example, does this server contain a specific application, or how many licenses of a CAD application are in use on this system).  Using these custom parameters, administrators can create elaborate load balancing scripts for maximum customization

    Static data

    Static data is a simple JSON object that never changes.  The exact same object is sent on every update.  Static data is good if you want to group specific servers together, or you want to advertise applications on a system.  It can also be used as a way to reject users from launching sessions on the server

    The object will be sent on every update and will be available under the static parameter

    Metrics

    Static data works well in defining what exists on a system, but the real power of load balancing occurs when you can understand the current state of the system.  Metrics accomplishes this task by allowing custom javascript functions to be executed on update and the results sent along with the update.  With a few lines of code, you can execute commands that can query the current state of the system and pass them to the cluster.  Examples include, query the number of licenses available on a server, finding which users have accounts on this system, or even polling to see when the server is ready to accept new sessions.  Anything that can be scripted can be customized into a metric!

    Each of the metrics functions will be executed on every update.  Functions that properly resolve will be added to the metrics object.

    Note: Do not give the same name to multiple metrics.  There is no way to determine which one will be sent on an update.

    Job scheduling

    Load balancing is effective at determining where a session should start at the time the user launches the session.  However, proper resources may not be available at that time.  In cases like this, job scheduling is the proper solution.  FastX allows administrators to offload jobs onto their third-party job scheduling tools (e.g lsf, moab, slurm etc) to be launched at a later time.  FastX will execute the job as the logged in user and return any output back to the user.  The third-party job scheduling script can then start a FastX session from the command line once the proper resources are available and the session will display in the user’s session when ready.

    Creating a job scheduling script

    1. Create a cluster
    2. Go to the System > Clustering > Load Balancing
    3. Click New Script
    4. Enter a name
    5. Enter the job scheduling command, See this job scheduling tutorial for examples
    6. Save

    Using a job scheduling script

    FastX gives administrators the option to create multiple job schedulers and attach them to different bookmarks.  Some bookmarks can start immediately while others can be scheduled.  This allows greater flexibility in customizing the way sessions are launched.  To use a scheduling script,

    1. Go to the System > Sessions > Bookmarks
    2. Edit a bookmark
    3. Change the Job Scheduling option to your script
    4. Save

    A user who launches this bookmark will launch it using the job scheduler.  If the bookmark is set to Start Immediately the FastX Load balancer will be used instead.

    Note: Job schedulers as executed as the logged in user on the system the user has logged in to.


    Load Balancing Tutorial

    $
    0
    0

    In FastX 3, load balancing is accomplished by writing a custom javascript function that will return the proper server id of the server that you wish to execute the action on.  In most cases, the amount of custom code will be minimal so while javascript knowledge is preferred, a person with some basic scripting knowledge should be able to modify some of these examples to fit the need.

    The load balancing function

    Here is the basic structure of the load balancing function to return the local serverId.

    function  (input) {
      return input.local.serverId;
    }
    

    All functions will begin with the line which declares the function.

    function  (input) {

    The load balancing function takes one parameter input which is a JSON object of all the data needed to make a decision

    The next line returns the serverId of the system that is executing this function.  This function MUST return a serverId in order for load balancing to succeed.

    return input.local.serverId;

    Finally, the last line is the closing bracket of the function

    }

    The input object

    The input object has all the information needed to choose which server to execute the function on.  This is what the inout object looks like

    {
      "action": "STRING", //the action that will be executed,  "user/login" || "session/start"
      "user": { //user data object
        "login": "STRING", //the login name of the user
        "serverId": "STRING", //the serverId of the user (if action = "session/start")
      },
      "local": { //local server object
        "serverId": "STRING", //the serverId of the system executing the function
      },
      "servers": [ server_object1, server_object2, ..., server_objectN], 
      //array of server objects
    }
    

    The server object

    Each server object has the following parameters

    {
      serverId: "STRING", //server's id
      urls: ["https://192.168.1.100:3300"], //array of the server's urls
      hostname: "STRING", //server's hostname
      sessions: INT, //number of sessions currently running on this server
      uptime: INT, //uptime of the server
      loadavg: [ INT, INT, INT ], //load average of the server (1, 5, 15 minutes)
      totalmem: INT,  //total memory in bytes
      freemem: INT, //free memory in bytes
      sudo: BOOLEAN, //is FastX sudo user enabled?  This allows starting sessions on START
      create: [ "login", "start"], //actions that are enabled on this server
      static: { // user defined static data },
      metrics: {// user defined metrics },
    }

    A more complex example

    A typical use case of the load balancing function is to filter out servers not matching the criteria, then sorting the results, and getting the serverId with the lowest/highest value.  A typical function would look like this

    function (input) {
       let myArray = input.servers
       .filter (c => c.static.group === "G1") //get all servers in the G1 group
       .sort ((a, b) => a.freemem > b.freemem); //sort based on the amount of memory available
      return myArray [0].serverId; //return the serverId of the first server in the array
    }
    

    Javascript has many built in array manipulation functions available to it. Array.prototype.filter and Array.prototype.sort can be chained together to easily get the serverId you need

    Per user criteria

    Since we have some user data available, why don’t we use it to return different servers based on who is trying to start the session

    function (input) {
       if (["admin1","admin2", "admin3"].indexOf (input.user.login) >= 0) {
           //if your username is admin[1,2,3], connect locally
           return input.local.serverId;
       }
       if (input.user.login === "blacklisted_guy") {
          return; // if you do not return a serverId, you cannot log in
       }
       //else, connect to the one with the most memory
       let myArray = input.servers
       .filter (c => c.static.group === "G1") //get all servers in the G1 group
       .sort ((a, b) => a.freemem > b.freemem); //sort based on the amount of memory available
      return myArray [0].serverId; //return the serverId of the first server in the array
    }
    

    Conclusion

    Javascript is a simple, easy to use language with lots of built in functions available.  The input object should give you all you need to create a complex function that can return the proper serverId so that you can create user defined load balancing scenarios based on your own criteria.

    If you have any questions or need further assistance, please contact StarNet Support


    Job Scheduling Tutorial

    $
    0
    0

    The purpose of the Command field is to execute a command that will run a third-party job scheduler to do the work of scheduling and starting a FastX session when the server is ready.  This way, administrators can use their professional level job schedulers to distribute the workload evenly across a cluster.

    The command field

    The command field will be executed like any other shell script.  The variables sent from the start script will be available as in the when executing the script. An example will help clarify

    The following example submits a job that starts a FastX session

    bsub "/usr/lib/fastx/3/tools/session" --command "${ start.command }" --geometry ${ start.geometry }"

    Variables

    The start parameters from the start command are available to be used.

    The start parameters have the format ${ start.__paramname__ }

    For example

    ${ start.command } // the start command
    ${ start.geometry } //the initial geometry
    ${ start.name } // the name of the session
    ${ start.params.key1 } //custom parameter 1 sent to the session
    ${ start.params.key2 } //custom parameter 2 sent to the session
    

    Specifying job scheduling options

    Suppose you want to schedule a job on a server with a minimum amount of 15GB RAM available.  The easiest way to do this is to specify this option as a start param (e.g ${ start.params.RAM } ).  Then in your command add it as a job scheduler option

    Metrics Tutorial

    $
    0
    0

    Metrics are system specific data that can change over time.  Contrast this with static data which always stay the same, each metric is a javascript function which executes on every server update.  The function returns a promise allowing for asynchronous programming.  In practical terms, this means you can execute a custom linux script, get the result, and then pass it as the value of the metric.  This is a great way to fully customize the server data that is being sent to the cluster.

    The metric function

    A metric function looks like this. This function returns a random number on each iteration

    function (input = {}) { 
      return new Promise ((resolve, reject) => {
        return resolve (Math.random ())
      });
    }
    

    The first line is the function declaration

    function (input = {}) { 
    

    Then we return a promise which will resolve sometime in the future

    return new Promise ((resolve, reject) => {
        return resolve (Math.random ())
      });
    

    Don’t forget the closing bracket!

    }

    This function has full access to the nodejs environment, which means it can pull in any node module available to it. While nodejs is a great environment to work in (FastX is built on it!), most integrators will probably want to simply execute a script written in a language that they are more familiar with. Let’s see how we can do that

    The input object

    Currently the input object is empty {}

    The metric function calling an outside script

    function metric (input = {}) {
       let file = '/usr/bin/echo'; //path of script to exec
       let args = [ (1 + Math.random ()*10) ]; //array of arguments to pass to the script
       const execFile = require ('child_process').execFile; //require the exec function from a node module
       return new Promise ((resolve, reject) => {  //create a promise to be resolved later
          execFile ( file, args, (err, stdout, stderr) => { //execute the command 
              if (err) return reject (err); //fail (reject) if there is an error
              if (stderr.length) return reject (new Error (stderr)); //fail if there is standard error
              console.log ('e',stdout)
              return resolve (Number.parseInt (stdout, 10)); //return the random number as an INT
          });
       });
    }
    

    This example makes use of the  child_process node module.  You can adapt this function by modifying the file and the args variables to execute your own custom script that will give the result you need.

    Note: stderr and stdout always return strings.  Here are some helper functions you may want to know about to get the output in a easier to use format

    • Number.parseInt (string, radix) — parses a string argument and returns an integer of the specified radix
    • Number.parseFloat (string) — parses a string argument and returns a floating point number
    • JSON.parse (string) — parses a JSON string, constructing the JavaScript value or object described by the string.  You can also use this function to convert string “true” and “false” to boolean true/false

    Testing your function

    After you create the function the best way to test is to call it.  Copy your function to a test.js file.

    Add the line to the bottom of the file

    metric ().then (console.log,console.log);
    

    This line will call the function and log either the result, or the error

    X-Win32 v19 Direct Download

    Authentication is required …

    $
    0
    0

    Problem:

    Running gnome or another desktop, the user receives the following error.

    Authentication is required to set the network proxy used for downloading packages

    Authentication is required to create a color managed device

    Solution

    Authentication is required to set the network proxy used for downloading packages

    Login as root and create or edit the file /etc/polkit-1/localauthority/30-site.d/20-no-show-proxy-dialog.pkla with a text editor and add the following content:

    [No Show Proxy Dialog]
    Identity=unix-user:*
    Action=org.freedesktop.packagekit.system-network-proxy-configure
    ResultAny=no
    ResultInactive=no
    ResultActive=no

    ——————————

    Authentication is required to create a color managed device

    Login as root and create or edit the file /etc/polkit-1/localauthority/50-local.d/color.pkla with a text editor and add the following content:

    [Allow colord for all users]
    Identity=unix-user:*
    Action=org.freedesktop.color-manager.create-device;
    org.freedesktop.color-manager.create-profile;
    org.freedesktop.color-manager.delete-device;
    org.freedesktop.color-manager.delete-profile;
    org.freedesktop.color-manager.modify-device; org.freedesktop.color-manager.
    org.freedesktop.color-manager.modify-profile
    ResultAny=yes
    ResultInactive=yes
    ResultActive=yes

    FastX Utilizing A Standard Authority File Location

    $
    0
    0

    Problem:

    Users using a standard authority location such as:

    /server/homer/username/.Xauthority

    Solution:

    Copy the authority cookie to the default location before invoking the application that ignores the XAUTHORITY environment variable. To do this, run this command:

    xauth -"$HOME/.Xauthority" merge "$XAUTHORITY"

    How you run that command depends on how you are starting your FastX session. If your FastX session starts an interactive shell, such as an ordinary “xterm” command, then you can put these lines in your $HOME/.bashrc file, or /etc/bashrc to make it happen for all users. (Assuming you are using the standard Linux bash shell. If you are using something else we can find a solution.):

    if [ -n "$DISPLAY" -a -n "$XAUTHORITY" -a "$XAUTHORITY" != "$HOME/.Xauthority" ]; then
    xauth -f "$HOME/.Xauthority" merge "$XAUTHORITY"
    fi

    If you are directly invoking your GUI application from a FastX bookmark, then you would prepend the above command in the bookmark command field. For example, let’s say your command is currently “grid”. You would change the bookmark command to:

    xauth -f $HOME/.Xauthority merge $XAUTHORITY; grid

    If you are invoking the grid engine from a separate shell script, then you should add the lines to your .bashrc file to the beginning of this shell script.

    Viewing all 285 articles
    Browse latest View live


    Latest Images